E2E Testing in Next.js with Playwright, Vercel, and GitHub Actions: A Guide Based on Experience
A guide on setting up and writing E2E tests for a Next.js app using Playwright. Based on hands-on experience.

I have just spent 2 days — around 4 hours each day — setting up end-to-end (E2E) tests for my Next.js app. I have had a fair share of experience setting up E2E tests for previous projects, with different tech stacks and frameworks, but setting up this kind of test has never been straightforward. Thus, I’m writing this blog post for the future me whenever she sets up yet another project and would like to set up E2E tests again. Although the post format would be a mix between a tutorial and learnings from my experience, I hope this post could be beneficial for you (yes, you as the one who’s currently reading this post).
Table of Contents
Why do I need E2E Tests?
When developing software, writing tests is a means to catch a bug whenever new code is introduced to the code base. There are several types of tests one can set up for a software project — unit, integration, and end-to-end testing.
I had this notion before that writing test is being responsible for your own code, but honestly, I had been putting off writing any test for my project (more about the project below) because it hinders the momentum that drives me to deliver the end product.
Now that the web app has reached beyond its MVP state, and I’m planning on doing a bit of backend migration — I think this is the right time to introduce tests. And I happen to just pick the integrating E2E test for now for my Next.js app.
About The Project Used in This Guide
So, I’ve been developing a simple web app for my Japanese learning journey called Ichi Bun Zutsu. It’s a web app that simply shows one Japanese sentence at a time for reading practice. The learner can then check their understanding of the sentence by showing the English translation of the sentence. The project was initiated mainly for me to learn Next.js and Typescript. It’s available here: the web app and the source code.
Although I’ll be using this project to describe the step-by-step process of setting up E2E testing, you should (hopefully) be able to follow along with any Next.js app.
There are several Javascript library options we can use for writing the test — the most known are Puppeteer (usually with Jest), Cypress, and Playwright. I had had a fair share of experience before both with Puppeteer and Jest, thus for learning purposes I picked up Playwright this time.
Setting up Playwright
To setup Playwright with Next.js, if we’re starting a new project we can use the with-playwright sample app provided by Next.js and use it with create-next-app :
npx create-next-app@latest --example with-playwright with-playwright-appBut in my case (and maybe yours too), I already have an existing Next.js app and would like to add Playwright. We can do the manual setup described in the Next.js documentation, but I prefer the way described in the Playwright documentation:
yarn create playwright
# or npm init playwright@latest
You’ll be prompted with the following questions to choose how you'd like to set up Playwright:
✔ Where to put your end-to-end tests? · tests/e2e
✔ Add a GitHub Actions workflow? (y/N) · true
✔ Install Playwright browsers (can be done manually via 'yarn playwright install')? (Y/n) › true
The GitHub Actions workflow is set to false by default, so if you’re planning to run the tests as CI using GitHub Actions, I recommend setting this to true so the playwright can generate the workflow YAML file as well. We'll modify the YAML file later in this guide.
After the setup these directories and files should have been added:
.github
└── workflows
    └── playwright.yml
tests-examples
└── demo-todo-app.spec.ts
tests/
└── e2e
    └── example.spec.ts
playwright.config.ts
Now you can try running the test examples by running:
yarn playwright testAnd the tests should pass, and we can even see the report by running:
npx playwright show-reportI also added "test:e2e": "playwright test" to my package.json scripts field for convenience's sake, so tests could be run with this command as well:
yarn test:e2eNow, let’s make some adjustments to the Playwright configuration file — playwright.config.ts. The full config is available here, but the important additions are the following:
// playwright.config.ts
const PORT = process.env.PORT || 3000;
const BASE_URL = process.env.BASE_URL || `http://localhost:${PORT}`;

const config: PlaywrightTestConfig = {
	...
	use: {
		...,
		baseURL: BASE_URL,
	},
	webServer: {
    command: `yarn dev`,
    url: BASE_URL,
    timeout: 120 * 1000,
    reuseExistingServer: !process.env.CI,
  },
	...,
}
By adding the baseUrl config, we can omit the full URL when writing the tests and only provide the route. The webServer configuration, on the other hand, is for Playwright to automatically run the local dev server before starting the tests. For more detail on Playwright configuration options, please refer to their test configuration documentation.
Now that we’ve finished setting up Playwright, you can poke around the provided test examples — the one in the tests-examples is a more detailed example test for a todo app. Once you’ve finished exploring, let’s remove them from our repo:
rm tests/e2e/example.spec.ts
rm -R tests-examples
Now, let’s get going on writing our own test.
Writing Tests
Let us create a test for our index page:
touch tests/e2e/index.spec.tsLet’s start with a simple test. For my web app, the index page would be redirected to the /settings modal for first-time visitors. So I’d like to assert in the test that the redirection happens. Here’s the short test:
// tests/e2e/index.spec.ts
import { test, expect } from '@playwright/test';

test('homepage redirects to /settings', async ({ page }) => {
    await page.goto('/'); // remember -- we don't have to provide full URL as we already set baseUrl in playwright config file
    await expect(page).toHaveURL('/settings');
});
Alright, let’s try running the test using the command, yarn test:e2e and it should pass.
Now let’s expand this test so to be more “end-to-end” to cover the following user interactions (you may want to try the web app to understand the flow better):
- The user clicks the
SAVE SETTINGSbutton - After loading, the user should see a Japanese sentence with a
SHOW ENGLISHbutton below it - The user clicks the
SHOW ENGLISHbutton, and should see the English sentence counterpart
Simple enough? Well, let’s try writing the test:
import { test, expect } from '@playwright/test';

test('index page shows a japanese sentence and a button to show the english translation', async ({ page }) => {
    await page.goto('/');
    await expect(page).toHaveURL('/settings');
    await page.getByRole('button', { name: 'Save Settings' }).click();
    await expect(page.getByTestId('japanese-sentence')).not.toBeEmpty();
    await page.getByRole('button', { name: 'Show English' }).click();
    await expect(page.getByTestId('english-sentence')).not.toBeEmpty();
});
Playwright provides several ways to locate elements through their Locator API — please check the documentation to find the one that suits your needs. Here, I’m relying on using two types of locators:
- getByRole to locate the
Save SettingsandShow Englishbutton - getByTestID to locate the Japanese and English sentence
On that note, when using getByTestID we would need to add data-testid attribute to the elements, for example on pages/index.tsx in my project:
// pages/index.tsx
...
<Typography data-testid="japanese-sentence" component="h1" variant="h4" align="center">
   <JapaneseSentenceElement sentence={sentence} />
</Typography>
...
<Typography data-testid="english-sentence" variant="h5" align="center">
   {sentence['en']}
</Typography>
...Instead of manually writing the test, we can also use Playwright’s test generator to write the code for us. First, run the web app on your local machine in a different terminal:
yarn dev # or npm run devthen run the codegen:
npx playwright codegen localhost:3000See Test Generator documentation for more details.
Alright, let’s run the test — run yarn test:e2e and the test should pass.
Setting up CI using GitHub Actions
By using yarn create playwright earlier and opting for GitHub Actions workflow to be added, one might expect that we can just push this to GitHub and the CI should run and tests should pass. It did pass when we ran it locally, right?
So let’s try it, commit the files and push the changes to GitHub:
git add .
git commit -m "chore: set up E2E test using playwright"
git push --set-upstream origin playwright-playground # branch name
Now, in order to trigger the CI job, what should we do? Let’s check the .github/workflows/playwright.yaml file that Playwright has created for us, and you should see this section:
...
on:
push:
branches: [ main, master ]
pull_request:
branches: [ main, master ]
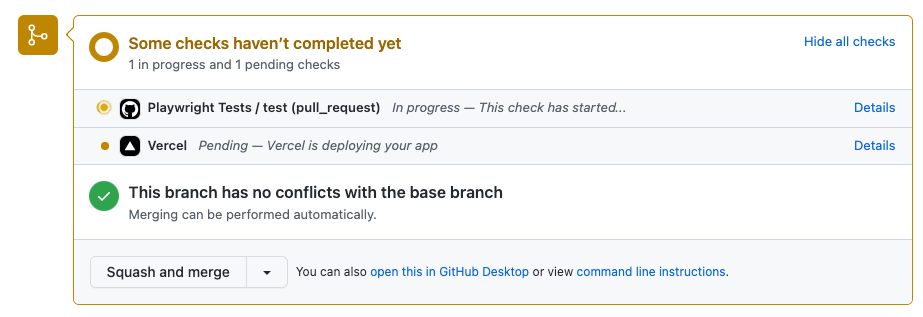
...It means the job will be triggered either on a push or a pull-request to the main branch. So let’s try creating a pull request by visiting [your-github-repo-url]/pull/new/[branch-name]. In my case: https://github.com/enreina/ichibunzutsu/pull/new/playwright-playground. Choose Create pull request , and after the Pull-Request (PR) is created, you should see the Playwright tests workflow running. You can click the Details link to see the logs.
And… in the case that the test fails (which it did), the logs should show something like this:
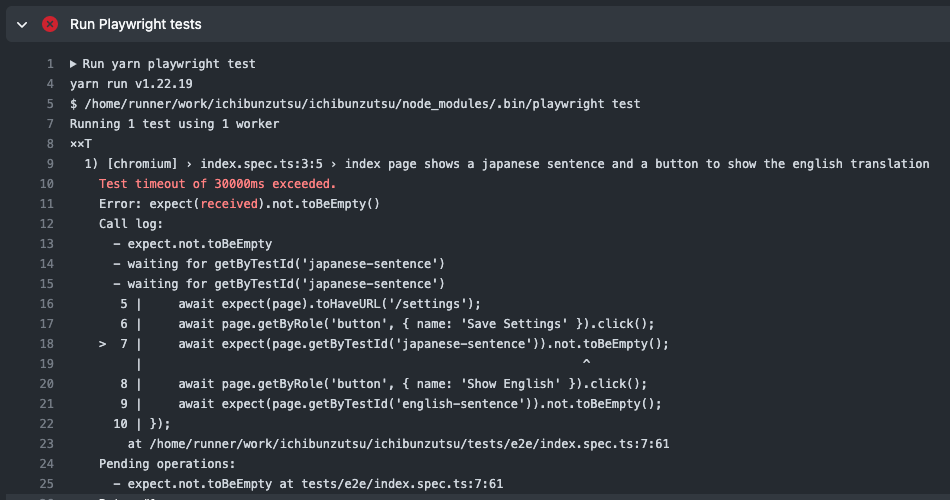
Alright, let’s think a bit. The test had passed on my local machine so why did it fail on GitHub Actions? The answer: Environment Variables.
In order for the web app to work and be able to fetch data from the API, I need to set an API Key as an environment variable. For local development, I set my API key in the .env.local file, which generally should not be committed to Git. I need to set the following variables in order for the web app to work:
SHEETSON_API_KEY=some_api_key
SHEETSON_SPREADSHEET_ID=some_spreadsheet_idIn our case right now, we run a “local” deployment on the GitHub Actions server, but we never let GitHub know the values of the necessary variables. So we’d need a way to pass them without publishing them on the repo itself.
Another preferred option is to run the test against a “preview” deployment, so we won’t need to run the app on the CI job itself. In this case, the environment variables should be set up on whichever deployment platform you’re using. In this post, as I’m using Vercel to host my app, I’ll describe the way to run the test against Vercel’s preview deployment.
Option 1: Run tests against localhost (on GitHub Actions server)
Let’s first try the first option to run the app on the CI job. We first need to store the environment variables as Actions secrets. Basically:
- Go to the
Settingstab of your GitHub Repo - Click on
Secrets > Actionsunder the Security section - Click on the
New repository secretbutton and fill in the variable name and value
If you need multiple variables set up, simply repeat the steps. In my case I added two secrets to my project:

Then, we’d need to pass these secrets to the workflow by modifying the playwright.yaml file. In the step named Run Playwright tests , add the variables in the env field:
...
- name: Run Playwright tests
  run: yarn playwright test
  env:
    SHEETSON_API_KEY: ${{ secrets.SHEETSON_API_KEY }}
    SHEETSON_SPREADSHEET_ID: ${{ secrets.SHEETSON_SPREADSHEET_ID }}
...
Commit and push the change. Again, let’s check the logs of the workflow on GitHub Actions. After a few minutes — voila 🎉 the test passes!
I had spent a few hours trying to figure out why my test was still failing because I set the variable as
SHEETSON_SPREADSHEET_ID on the .yaml file, but as SHEETSON_SPREADHEET_ID everywhere else.Option 2: Run tests against Vercel Preview Deployment
Okay, now let’s try on the second option to run the tests against a Vercel Preview deployment. I personally prefer this option as I already have a Vercel setup for my preview and production deployment, and it would be ideal to have a testing environment as similar as possible to the production environment (which is what preview deployments are for).
I’d assume you also already have Vercel setup for your project — if you haven’t, worry not, as it’s very straightforward moreover for a Next.js app. You can check the quickstart guide here.
Now, the idea is to wait for Vercel’s preview deployment to be completed, and then we would use the preview URL to run our Playwright tests against. We’ll be using a premade Github Action, patrickedqvist/wait-for-vercel-preview@v1.2.0 (repo link) to achieve this. Let’s update our playwright.yaml, by inserting this as the first step of the workflow:
...
steps:
  - name: Waiting for 200 from the Vercel Preview
    uses: patrickedqvist/wait-for-vercel-preview@v1.2.0 # <https://github.com/patrickedqvist/wait-for-vercel-preview>
    id: waitForDeploy
    with:
      token: ${{ secrets.GITHUB_TOKEN }}
      max_timeout: 300
  ...
Also, we’d need to use the outputted preview URL as the base URL for our playwright tests. Let’s set this as env in the Run playwright tests step:
...
- name: Run Playwright tests
  run: yarn playwright test
  env:
    BASE_URL: ${{ steps.waitForDeploy.outputs.url }}
...
The full playwright.yaml for my project can be checked out here.
Also, let’s modify our webServer field in our playwright.config.ts:
...
webServer: process.env.CI ? undefined : {
    command: `yarn dev`,
    url: BASE_URL,
    timeout: 120 * 1000,
    reuseExistingServer: true,
},
...
This way, when we run the tests on our local machine, the local dev server would still be started. Though, on GitHub Actions, we don’t need it to be run as the tests would instead be run against the preview URL from Vercel.
Alright, let’s commit and push the changes. Then, check the logs on the PR — and if nothing is broken (e.g. Vercel Deployment fails), the test should pass.
Now we have our E2E tests and CI set up, and we can merge the change to the main branch, which you can do through the Merge pull request option on your GitHub PR.
Summary
I hope the experience/guide I shared above would be beneficial for anyone who wants to start writing E2E tests for their Next.js app. I believe Playwright provides a good example of a testing library that makes it easy to incorporate into our project. It would generate necessary starting sample tests, configuration files, and even a GitHub workflow setup. Of course, we’d need to adjust them to suit our needs.
In the post, I described my experience of setting up E2E tests and the overall process are:
- Integrating the testing library (in this case Playwright)
- Writing the tests
- Run the tests locally
- Setup the tests to run on a CI environment (in this case GitHub Actions)
- [optional] Set to run the tests against a preview deployment (in this case from Vercel)
And — that’s it!